Fun with re-editing
Feb 25, 2013
If you've been a photographer for a while, you'll know that over time, your style evolves and changes. When I picked up my first digital SLR in 2005 (it was a Canon 350D), I hardly even used to touch my photos in post-processing as I didn't yet understand what was possible. A bit of extra contrast maybe, some more saturated colours here and there. When I completed my life-changing Project 365 in 2007 however, that all changed. I started shooting in RAW and spending a LOT more time messing around in Adobe Lightroom and Adobe Photoshop. I joined Flickr, downloaded actions, read tutorials and gobbled up all the knowledge I could. I experimented a lot! I went through many phases including what could probably be best described as a technicolour dream world phase. Think completely oversaturated colours and weird colour shifts - cyan skies, anyone?
By the time I decided to focus on pets and start my business, I was somewhat settling down a little with the heavy editing and starting to find my own personal style.
I was sorting through some old photos today and came across some of my very first paid photo shoots. I have to admit, I was a little shocked and somewhat embarrassed at the editing! Then again, there was nothing overly "wrong" with them - just a different style. And the clients loved them! I thought it might be fun though to go back and re-edit some of my old shots. So below you'll find the original, the first edit, and my re-edited version.
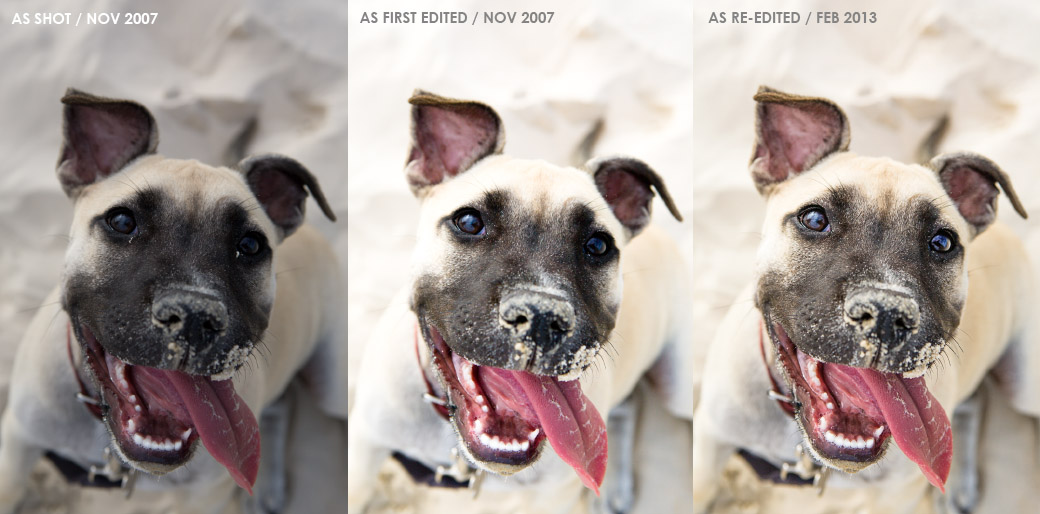
First up, we have Ralphy the American Staffordshire Terrier. This was shot on my old Canon 5D, with a 24-70mm f2.8 lens at 51mm, f5.6 and 1/320 sec. Back then, I used to shoot on Aperture Priority mode (AV) and unfortunately many of my shots of Ralphy were underexposed. This is because when left to it's own devices, the camera always attempted to make the whole scene medium grey. Since Ralphy was a light dog (mostly) on a bright background, it underexposed him. My first attempt at editing was good in that it lightened up the whole shot. But unfortunately, at the time, I was in "high contrast" mode and lost a lot of detail in the lightest and darkest areas.
In my latest edit of this shot, I lightened the image but retained detail in the bright areas by pulling back the highlights. I also pumped some light into the shadows to retain detail there. I found the original to have a bit of a cold/blue cast, so I also fixed up the white balance by making it warmer/yellower. Finally, to get the focus on the eyes, I applied some extra sharpening and contrast to the eyeballs, making them pop out from Ralphy's dark face. I'm pretty happy with the final result, it could almost be something I'd show a client these days, as I love Ralphy's expression and sandy face!
Next, we have Blaise the Boxer. Beautiful Blaise had been battling cancer for a while and her owner wanted some shots to remember her by. Really, it was my very first Devotion session as by the time her order was ready to pick up, Blaise had tragically passed away.
I was still shooting on Aperture Priority mode at this stage, so my shots did tend to come out a bit dark. I think what threw the light meter off in this shot was Blaise's bright white stripe down her face. The camera, using centre weighted average metering, saw the white in the middle of the frame and exposed for that at the expense of the rest of the subject matter in the photo. This image was shot with the 5D and 50mm f1.8 lens (before I upgraded to the f1.4 version). The settings were: 1/800 sec at f1.8, ISO 100.
In my first edit, I used a similar technique to the shot of Ralphy - lightening the image but not really doing anything about the resulting blown out highlights and lost details in the shadows. I also was into heavy vignetting at the time and I think went a bit overboard on this shot, to try and get the focus back on her face. In my re-edited version, I increased exposure but also pulled back quite a lot on the highlights, trying to retain some detail in the white on her face. I also manually dodged a bit of light into her eyes as they are quite dark and tended to get lost. Not a bad shot, but if I was shooting this again I probably would have placed Blaise differently, allowing her face more even light coverage. Better lenses also help!

In my portfolio building stage, I also did many shoots with friends' dogs. Mambo is a gorgeous Border Collie cross that was lots of fun to work with and had a really great look! Remember when I mentioned my technicolour dream world phase? Well, this first edit is it. I used to have a few presets in Lightroom that I thought were really cool at the time. They boosted colour and contrast while adding a heavy vignette. One preset in particular also had a habit of making skies very cyan looking.
This was shot on the 5D with the 24-70mm lens. The settings were f4 and 1/3200 sec at ISO400 with the lens zoomed all the way out at 24mm. In retrospect, I probably could have taken the ISO back to 100 as that was a very fast shutter speed to be using! We were shooting on a little jetty leading out onto the canal, so I am guessing there was a lot of light being bounced off the water.
It's pretty obvious what I don't like about how I originally edited this shot. Too much contrast, too much saturation, weird colour shifts and very little detail in the shadows. Not to mention the terrible fake vignette on the nice white boards! In re-editing this shot, I've lightened the image overall and also brought some details back into the highlights and most importantly the shadows. You can now actually see Mambo's eyes! If I were to shoot this again, I'd make sure the hose in the background was taken away as I find it a bit distracting to the shot, and not super easy to remove in Photoshop. I'd also try for a somewhat better expression from Mambo, as he looks absolutely pooped!

This last shot is also of Mambo, shot in the same location but from a different viewpoint. Similar settings too - zoomed in a bit at 43mm, f4 and 1/3200 sec at ISO400.
This is another classic case of shooting on AV mode and the camera not interpreting the scene correctly. The white deck background has completely confused the metering system, making the camera setting the shutter speed much faster than it needed to be and completely underexposing the image. When editing the first time around, I correctly brought the exposure back to where it should be, which worked well. Unfortunately, in an attempt to bring some life back to the rather dull shot, I boosted the contrast more than I needed to, and ended up with blown out details in the background, and overly dark, shadow areas that lacked detail in Mambo's eyes. I also went a bit overboard with the saturation, making Mambo's fur unnaturally orange and almost giving him a face mask with light circles under his eyes.
In the re-edit, I lightened the shot, being careful not to lose detail in the background white decking. I filled in the shadows with some light and gave the shot a bit more contrast and saturation. Mambo's eyes really nicely reflect the sky (and myself!) in this shot, so I emphasised this with a bit of extra contrast and sharpness in his eyes only. Finally, I quickly removed the loop of hose intruding into the shot from the left. Superficially, this shot didn't turn out too badly in the end. It's not something I would show the client these days however, as the degree of lightening I had to do really degraded the image quality, and it would be quite obvious and noisy if enlarged for some wall art.

I hope this has helped give a bit of insight into a few aspects of my editing process. Starting with my oldest images really made me see how far I have come, with both my editing and also the way I shoot nowadays. I put a lot more thought into getting the shot right in-camera now, shooting only on Manual to get the exposure right to start with. It took some practice when I switched from shooting AV but was definitely worth it in the long run.
I also realised that I have a much better concept of how to use sunlight that I used to. I came across a lot of shots in deep, murky shade, mainly because I was too scared to use the sun and didn't really understand how to work with direct sunlight. I also used to shoot at silly times of the day - mid afternoon and mid-morning, and in bad weather - overcast conditions. These days I exclusively shoot in the hour or two either after sunrise or before sunset to catch that beautiful golden hour and often re-schedule the session if the weather is too cloudy.
I like to think my style has come a long way since these early days, though it's fun to look back and see where it came from. The next blog post in this series will be about defining my style and I'll be sharing a few of my favourite shots and some background into how they were created. Stay tuned!
Start your pet photography journey with 100 free daily tips!
That's over 3 months worth of daily tips covering topics like working with light, obtaining expression, camera settings, shooting action, composition, using the location, dog handling tricks – and so much more. Delivered direct to your inbox so you can read and absorb straight away (no homework required).
We hate SPAM. We will never sell your information, for any reason.